There are a number of ways to create new projects in OTM from lsp.net. The workflow described here shows how to use an e-mail request from an existing client as the basis for a new project quotation.
The OTM Task Board shows an "orphaned e-mail"
When an e-mail is sent to the project management address in the Online Translation Manager from lsp.net, if it cannot be clearly associated with an existing project (via the project reference number) it is classified as an "orphaned e-mail" until it has been read and processed. Here a quotation request has been received from an existing customer; there is not yet a project associated with this request. Clicking the blue subject title or the Select button opens the mail to read it.
Read the e-mail
The e-mail contains an attached file and a request for a quotation. Clicking the button marked at the bottom of the e-mail will begin the quotation process. In an agency with multiple project managers, the drop-down field and button above the message could be used to assign the mail to an individual for processing.
Fill in the details on the project form
The quotation request form automatically copies certain details from the customer's master record. Here you add general informatio and notes relevant to the quotation. The volume and requested deadline fields are free text fields here, which are used for display in correspondence but not in calculation at this point. The lower part of the form (shown in the next step) contains a copy of the original e-mail message to be used as a reference while you fill in the quotation details. It is important to fill in the project name here, as it is used in the quotation and invoice documents. This is an appropriate place to write purchase order numbers or other data required by the client.
Add project notes and submit the request
Here is the lower part of the project request form. A copy of the original message text is included here and can be overwritten, or notes regarding special considerations for the project can be added. Clicking the marked button and the bottom of the form will submit the quotation request and continue the process.
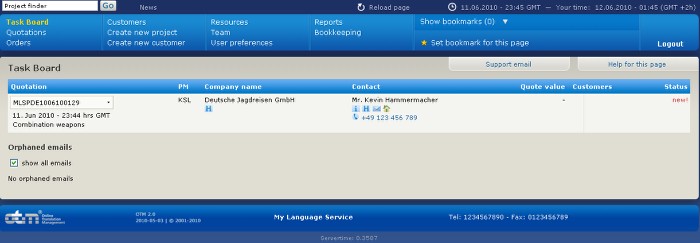
The task board shows the new quotation request
The task board now shows the new quotation request. The request will remain there on the "to-do" list until the request has been read and handled. The drop-down field in the quotation column enables access to all displays for the quotation. Use this to navigate to the "project switchboard".
Project switchboard view
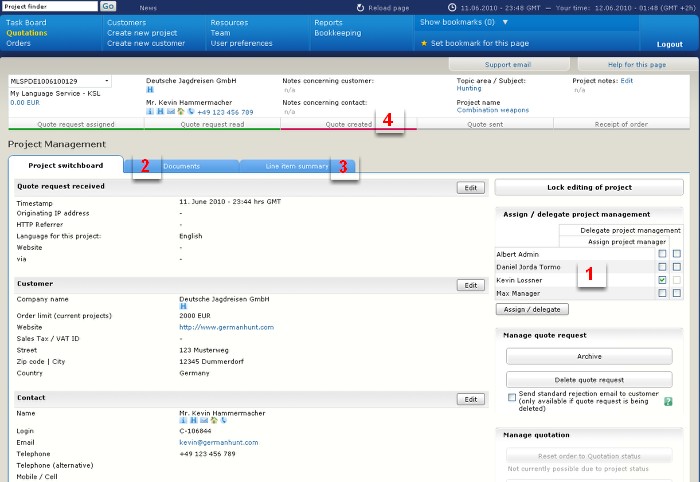
The project switchboard view enables customer and project data to be edited, a project manager to be assigned (see the area marked "1"), relevant documents (["2"]such as stored NDAs and contracts, price lists, terms and conditions from the customer, etc.) to be viewed, line items ["3"] in the quotation to be checked (none of those yet) as well as navigation through the quotation process via the step bar ["4"] below the summary at the top. Click "Quote created" in the step bar to continue. Because this step has not been completed, it is underlined in red. Status signals in the step bar follow the traffic light principle.
Composing the quotation
The "Address and settings" tab of the quote display enable you to customize the letter to be sent with the PSDF quotatio document. Make whatever changes are required here, then select the line items tab to continue to the actual quotation. The currency for the quotation can be set here, and the lower part of the form (not shown) allows specialty areas to be specified, which may be of use in identifying translators to handle the translation.
Line items tab
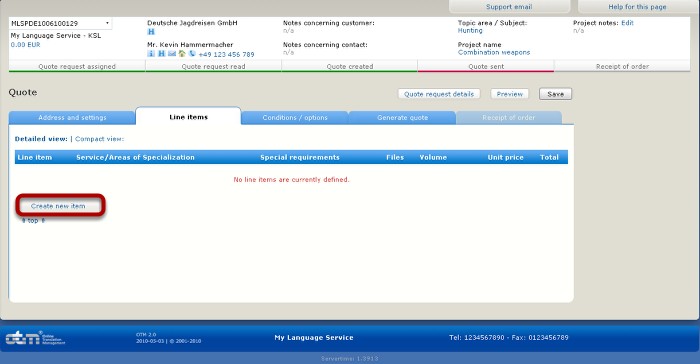
Click the "Create new item" button to create a line item for the quotation. If you create running invoices for monthly billing or similar, each line item on the invoice will be entered separately this way.
Line item entry
Select the languages for the line item on this tab (Service / Special Requirements) and enter notes to be included on the quotation regarding special requirements. The notes are free text, and a number of pre-configured suggestions are provided. Note the selection shortcuts under the drop-down fields for language selection. When you are finished on this tab, click the Quantification / Price tab to continue.
Specify quantity, price, etc.
Select the files for the line item here (only one in this case, but if there were more in the project, all would be available here for selection). Enter the appropriate costing information, then click the Save item button.
Completed line item and quotation cost summary
After saving the item, the cost summary is shown. Clicking the line item enables it to be edited. Additional line items can also be added here. Continue now by clicking the "Generate quote" tab to create a quotation document to send to the customer (or just to file for your reference).
Cover letter for the quotation
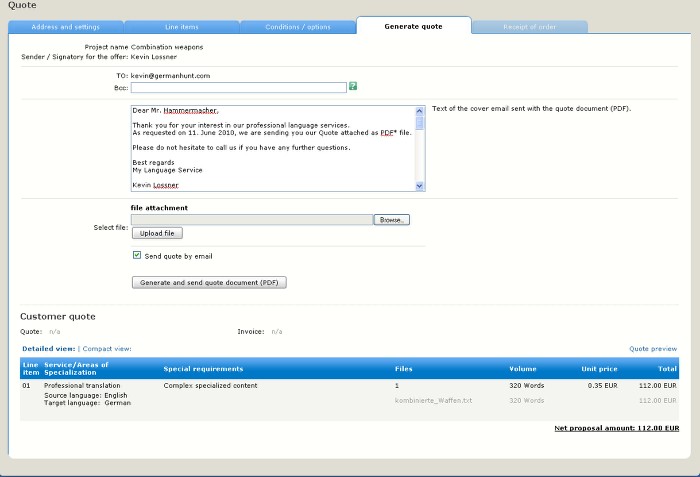
The quotation cover letter can be customized here. If you do not wish the quote to be sent to the client, unmark the corresponding checkbox. (You can, of course, skip the quotation entirely and go straight to the receipt of the order after the line items are entered.) After the quote is generated, the view returns to the Project Switchboard.
PDF quotation document
This is the first page of the quote. Typically, the PDF file generated includes a company profile, references and terms and conditions of business.