Jun 27, 2010

Participate in the BDÜ rate survey for 2009

For the past three years, the German association for translators and interpreters BDÜ has conducted a rate survey to provide more transparency with regard to the actual rates obtained by working translators and other service providers. The survey is conducted in German, but it is apparently not limited to BDÜ members. The closing date for the survey is July 4th.

If you have a good reading comprehension of German and are a provider of language services, I would like to encourage you to participate in the survey. I personally have found the results for 2007 and 2008 to be very enlightening, and I have been able to make valuable business planning decisions based on them. Some of the survey results (for language pairs that interest me) have been published here, and a booklet with all the results is available for purchase on the BDÜ web site (www.bdue.de) for € 15. This is business intelligence worth paying for.

To join the survey, go to http://www.honorarumfrage.bdue.de.

Jun 26, 2010

Generating the invoice and concluding the project in OTM

After delivering a project in OTM, it's simple to generate and send the invoice. Click on "Invoice" in the progress bar under the project summary near the top of the display to get started.

Tab for generating an invoice

Tab_for_generating_an_invoice.jpg
Note that there are various options available for the billing address. The terms can also be altered here. If there have been changes to the rates or line items, go first to the Edit line items tab and make the necessary modifications. Otherwise, click the Generate Invoice button to create the invoice. The PDF invoice can be sent directly by marking the checkbox above the button to generate the invoice. If you intend to print and send a copy of the invoice using the postal service, it is not necessary to mark the checkbox.

The invoice

The_invoice.jpg
Here's a copy of the invoice that was created and sent to the customer.

Generate invoice tab after the invoice has been created

Generate_invoice_tab_after_the_invoice_has_been_created.jpg
If you look at the Generate invoice tab again after the invoice has been created, you'll notice a new button to mark the invoice as paid. When the payment has been received, click the button. Clicking the Mark as Paid button will display a confirmation, then re-direct to the project switchboard.

Project switchboard view after the invoice has been paid

Project_switchboard_view_after_the_invoice_has_been_paid.jpg
Notice that after the invoice was marked as paid the line under Invoice changed from yellow to green. The next step is to wrap up the project and close the order. To do this, click "Conclude project" i the progress bar (it's underlined in red)

"Conclude project" tab

Conclude_project_tab.jpg
When you conclude a project you can also send a request to the customer for feedback. This is a good way to build your testimonials.

Customer's project history

Customer_s_project_history.jpg
After the project has been concluded, it will disappear from the order list. To view the project details once again (or to make changes, re-open the project, etc.), click the H icon under the company name or contact name in the project summary near the top of the screen. The project history for this customer is show above. Clicking the project number (blue text at the left) will open up the project switchboard view for the order.

Project switchboard view for a closed order (finished project)

Project_switchboard_view_for_a_closed_order__finished_pro.jpg
Notice that the entire progress bar is green, indicating that all steps have been completed successfully. If it is necessary to make changes, you can re-activate the order by clicking the corresponding button.


Related posts:


Jun 16, 2010

Delivering a job in OTM

This workflow describes how translated files are uploaded to OTM and delivered to the customer. In this example, the customer has service pages activated from which the delivery can be downloaded. If service pages have not been activated, the notification mail sent will contain an HTTPS link to the delivery which will be valid for two weeks.

Go to the Job Files tab for file delivery

Go_to_the_Job_Files_tab_for_file_delivery.jpg
Click "delivery files" in the project progress bar under the project information summary at the top of the view to navigate to the Files view. Select the job files tab there. Click the Upload button to show the controls for uploading the finished translation.

Upload the translation

Upload_the_translation.jpg
Use the Browse button to select the file to upload for the delivery. Multiple files should be packaged in a ZIP file or similar. Note the checkbox indicated by the red arrow. If this is marked, the delivery will be re-named automatically so that the file name is the same as the source file but with an extension added for the language pair (see the example in the next step). This is to help project managers avoid confusion with many files and many language pairs. However, if the wrong file is selected, this may not be immediately apparent, because the name will be changed! So be careful. If the checkbox is not marked, the original name of the uploaded file will be retained.

Reminder dialog

Reminder_dialog.jpg
Before the file is uploaded, a reminder dialog is displayed asking you to check that the delivery does in fact correspond with the requirements.

Delivery file uploaded

Delivery_file_uploaded.jpg
Note that the name of the delivered file was changed to that of the source file plus a suffix for the language pair. The time of the upload is indicated as well as the fact that the customer has not yet been notified.

Delivery notification mail

Delivery_notification_mail.jpg
Selecting the file delivery tab in the Files view shows the e-mail message to notify the customer of the delivery. In this case the customer can download the file from his service pages. This letter can be customized. Click the Send E-mail button to deliver the notification.


Related posts:


Receiving an order after a quotation in OTM

The workflow described here shows steps to follow after an order has been received for a quotation generated with OTM from LSP.net.

Go to the "receipt of order" view

Go_to_the_receipt_of_order_view.jpg
Click "receipt of order" in the project progress bar to navigate to the corresponding view.

Start the order phase

Start_the_order_phase.jpg
Enter the date of the customer order and click the button to start the order phase.

Add date information for the project period and deadline

Add_date_information_for_the_project_period_and_deadline.jpg
Type the information manually into the fields or click the calendar icons as a shortcut. If you do not wish to send a confirmation e-mail to the customer, unmark the checkbox! The e- mail text can be customized in the field on the right. Click the Save button to store the information in the project record. If the customer does not have service pages (for uploading, downloading and archiving project data) available yet, they can be activated by marking the checkbox at the lower left. Login information for the service pages will be sent to the customer by e-mail.

Confirmation sent

Confirmation_sent.jpg
The date and time of notification is recorded on the page. If the deadline is changed, re-visit this page to send an update notification. (The default e-mail template is updated automatically for changing the project deadline after the initial confirmation.) Now click "jobs assigned" in the project progress bar under the project data summary.

Job creation view

Job_creation_view.jpg
Now a job has to be created for the line item in the order. To do so, click the Create new job button.

Create / Edit job view

Create__Edit_job_view.jpg
You can add descriptive information in the corresponding field. This job will be assigned to the project manager for translation in order to simplify this example. This also reflects the way that a sole proprietor translator or small office with translators might often work. Save the job by clicking the Save button.

Job saved

Job_saved.jpg
This is the view after the job has been saved. If this job were to be posted to translators, you would click the corresponding button. However, since the job has been assigned to the project manager, this is the end of the procedure until the translated file needs to be uploaded for delivery.


Related posts:


Jun 15, 2010

Receiving an e-mail inquiry from an existing client and quotation in OTM

There are a number of ways to create new projects in OTM from lsp.net. The workflow described here shows how to use an e-mail request from an existing client as the basis for a new project quotation.

The OTM Task Board shows an "orphaned e-mail"

media_1276299350469.jpg
When an e-mail is sent to the project management address in the Online Translation Manager from lsp.net, if it cannot be clearly associated with an existing project (via the project reference number) it is classified as an "orphaned e-mail" until it has been read and processed. Here a quotation request has been received from an existing customer; there is not yet a project associated with this request. Clicking the blue subject title or the Select button opens the mail to read it.

Read the e-mail

media_1276299475750.jpg
The e-mail contains an attached file and a request for a quotation. Clicking the button marked at the bottom of the e-mail will begin the quotation process. In an agency with multiple project managers, the drop-down field and button above the message could be used to assign the mail to an individual for processing.

Fill in the details on the project form

media_1276299753151.jpg
The quotation request form automatically copies certain details from the customer's master record. Here you add general informatio and notes relevant to the quotation. The volume and requested deadline fields are free text fields here, which are used for display in correspondence but not in calculation at this point. The lower part of the form (shown in the next step) contains a copy of the original e-mail message to be used as a reference while you fill in the quotation details. It is important to fill in the project name here, as it is used in the quotation and invoice documents. This is an appropriate place to write purchase order numbers or other data required by the client.

Add project notes and submit the request

Add_project_notes_and_submit_the_request.jpg
Here is the lower part of the project request form. A copy of the original message text is included here and can be overwritten, or notes regarding special considerations for the project can be added. Clicking the marked button and the bottom of the form will submit the quotation request and continue the process.

The task board shows the new quotation request

media_1276299935403.jpg
The task board now shows the new quotation request. The request will remain there on the "to-do" list until the request has been read and handled. The drop-down field in the quotation column enables access to all displays for the quotation. Use this to navigate to the "project switchboard".

Project switchboard view

Project_switchboard_view.jpg
The project switchboard view enables customer and project data to be edited, a project manager to be assigned (see the area marked "1"), relevant documents (["2"]such as stored NDAs and contracts, price lists, terms and conditions from the customer, etc.) to be viewed, line items ["3"] in the quotation to be checked (none of those yet) as well as navigation through the quotation process via the step bar ["4"] below the summary at the top. Click "Quote created" in the step bar to continue. Because this step has not been completed, it is underlined in red. Status signals in the step bar follow the traffic light principle.

Composing the quotation

Composing_the_quotation.jpg
The "Address and settings" tab of the quote display enable you to customize the letter to be sent with the PSDF quotatio document. Make whatever changes are required here, then select the line items tab to continue to the actual quotation. The currency for the quotation can be set here, and the lower part of the form (not shown) allows specialty areas to be specified, which may be of use in identifying translators to handle the translation.

Line items tab

Line_items_tab.jpg
Click the "Create new item" button to create a line item for the quotation. If you create running invoices for monthly billing or similar, each line item on the invoice will be entered separately this way.

Line item entry

Line_item_entry.jpg
Select the languages for the line item on this tab (Service / Special Requirements) and enter notes to be included on the quotation regarding special requirements. The notes are free text, and a number of pre-configured suggestions are provided. Note the selection shortcuts under the drop-down fields for language selection. When you are finished on this tab, click the Quantification / Price tab to continue.

Specify quantity, price, etc.

Specify_quantity__price__etc..jpg
Select the files for the line item here (only one in this case, but if there were more in the project, all would be available here for selection). Enter the appropriate costing information, then click the Save item button.

Completed line item and quotation cost summary

Completed_line_item_and_quotation_cost_summary.jpg
After saving the item, the cost summary is shown. Clicking the line item enables it to be edited. Additional line items can also be added here. Continue now by clicking the "Generate quote" tab to create a quotation document to send to the customer (or just to file for your reference).

Cover letter for the quotation

Cover_letter_for_the_quotation.jpg
The quotation cover letter can be customized here. If you do not wish the quote to be sent to the client, unmark the corresponding checkbox. (You can, of course, skip the quotation entirely and go straight to the receipt of the order after the line items are entered.) After the quote is generated, the view returns to the Project Switchboard.

PDF quotation document

PDF_quotation_document.jpg
This is the first page of the quote. Typically, the PDF file generated includes a company profile, references and terms and conditions of business.


Related posts:


Jun 14, 2010

Foolish tools

No matter what translation environment tool is used to work on a text like the one below, the experience can be an unpleasant one. MemoQ's cell scrolling feature makes this horrible case just barely tolerable. It's one of the biggest tag salads I've see in a while. In a "future scenario" I would like to see some option for condensing messes like this so that the real work of translating the text can be accomplished better. Usually I see garbage like this in INX (InDesign) files. This particularly charming case is a TTX made from a DOCX and imported into memoQ for reasons that are too hair-raising to explain.

Jun 13, 2010

Re-sending e-mail to a different address

When one has used a number of e-mail addresses in the past, it is often difficult to "retrain" clients to use special e-mail addresses to integrate with the workflows of an online translation process management system like OTM from lsp.net. A simple way to redirect request messages which arrive on the "wrong" e-mail account so that they can be used most easily as the basis for setting up a project in OTM is to use the "resend" feature of Microsoft Outlook.

When an inquiry is directed to the "wrong" e-mail account

media_1276427830055.png
Open the mail message and select the command "Resend This Message..." from the Actions menu of the mail message window.

A confirmation dialog appears

media_1276427852753.png
Click "Yes" to re-send the message. The message will arrive at the new recipient's inbox with the original sender indicated as the sender of the rerouted message.

Erase the original e-mail recipient's address and enter the new e-mail to which the message is to be re-routed

media_1276427956915.png
In this case the message will be re-sent to a project manager's address in OTM.

The rerouted message appears in the incoming e-mail for the new recipient

Here the re-sent message appears in the "orphaned mail" in OTM. From there it can be opened and used as the basis for setting up a new client project.


Related posts:


Jun 12, 2010

Screen Steps for tutorials

Recently a colleague recommended a new documentation tool to me, which he insisted would save time in creating small tutorials of software or documenting procedures. I was rather sceptical, because over the years I have seen a lot of screen capture programs, and I still prefer to use the PrintScreen button on the keyboard, MS Paint and Wordpad or MS Word for writing these documents. But when he told me that the tool included a straightforward authoring environment and multi-channel output to MS Word, PDF, HTML, blogs, etc. I was intrigued.

So I downloaded a copy of Screen Steps and tried it out. I'm still figuring out all the tricks (like how to size the graphics correctly), but my initial impression is very good. I've written a few small tutorials, including one in my klutzy German explaining how to use memoQ RTF table output to make source files such as InDesign INX available for translation or review by persons who do not use translation environment tools. I tested the blog output feature, which offers a number of options. My first attempt went utterly haywire and had to be deleted (choosing BBCode output was a mistake), but the second attempt with "neutral" HTML worked and can be seen more or less unmodified here. I'm going to leave it in all its ugliness for comparison as I learn better ways to structure the output to a blog. Still I don't think it's all that bad for an initial attempt. I liked the HTML output of the same content better.

I often want to create content for a variety of media, so I think this "poor man's single sourcing option" is a fine thing. The trial version is good for 30 days, and the "high-end" version of the tool costs only about USD 80. That's a lot of useful function at a bargain price.

Jun 11, 2010

RTF-Tabellenexport aus memoQ für externe Bearbeitung

(Mit der Testversion von ScreenSteps erstellt. Weitere Informationen zu ScreenSteps sind hier.)

Diese Anleitung beschreibt wie man mit memoQ eine externe RTF-Datei erzeugen kann, mit der Personen für Übersetzung bzw. Lektorat eingebunden werden können, die nicht mit speziell für die Übersetzung bestimmten Arbeitsumgebungen wie memoQ, SDL Trados, Déjà Vu, Star Transit, usw. arbeiten. Das gewählte Beispiel benutzt eine aus InDesign erzeugte INX-Datei, die auch noch mit vielen Formatierungen versehen ist.

Auswahl der zu importierenden INX-Datei

media_1276252326405.png
Einer der zwei mit roten Kästchen markierten Optionen anklicken, um einen Auswahldialog zu öffnen. Die obere Option benutzt Standardeinstellungen; die untere Option ermöglicht den Einsatz diverser erweiterter Einstellungen für den Import.

Auswahl der zu importierenden INX-Datei

media_1276252636612.png
Die zu importierende Datei wird in dem Dialog ausgewählt.

Datei in der Liste der Übersetzungsdateien

media_1276252905605.png
Nach dem Import erscheint die Datei in der Liste "Übersetzungen". Nach Bedarf können die Inhalte geprüft werden indem man z.B. auf die Zeile in der Liste doppelklickt. Um die externe Bearbeitung, z.B. in SDL Trados oder einfachen Schreibprogrammen zu ermöglichen, klickt man auf das oben markierte Kommando.
media_1276253260004.png
Ein Dialog erscheint in dem man zwischen diversen bilingualen Exportformaten wählen kann. Um Übersetzung bzw. Lektorat in Microsoft Word, Wordpad, OpenOffice und alle andere Schreibprogramme, die mit RTF umgehen können, wählt man die Option "zweispaltiges RTF". Mit einem Klick auf "Weiter" hat man die Möglichkeit, besondere Einstellungen für die exportierte Tabelle vorzunehmen, aber für die meisten Fälle ist das uninteressant. Klicken der Schaltfläche "Export" öffnet einen Dialog zum Speichern der zweisprachigen RTF-Datei.

Speicherdialog für die zweisprachige RTF-Datei

media_1276257458164.png
In diesem Dialog kann man den Ablageort der zweisprachigen RTF-Datei bestimmen.

Exportierte "zweisprachige" RTF-Datei (unübersetzt)

media_1276258030653.png
Hier ist eine Ansicht der exportierten Datei. Die Warnung, keine Änderungen im Ausgangstext vorzuhehmen ist ganz ernst zu nehmen. Der Ausgangstext enthält Fehler, aber diese müssten vor dem Export beseitigt werden, nicht in dieser Datei. Um das später zu zeigen, wurde eine Kleinigkeit im 3. Segment geändert.
Der Übersetzer schreibt den Zieltext in der Spalte rechts. Bei solcher Arbeit besteht die Gefahr, dass Tags nicht ordentlich behandelt werden, aber das kann anschließend nach dem Reimport in memoQ geprüft und notfalls korrigiert werden.
Bei einem Lektoratauftrag ist die rechte Spalte bereits mit der Übersetzung gefüllt. Kommentare können immer zum Text hinzugefügt werden; diese erscheinen später in der memoQ-Umgebung, wo sie auch als Filterkriterium dienen können.

Ansicht nach Reimport der zweisprachigen Datei

media_1276261687014.png
Hier ist das dritte Segment leer auf der Zieltextseite, weil die RTF-Datei an dieser Stelle in der Ausgangstextspalte geändert wurde. Ansonst sind alle Inhalte sauber importiert worden. Der Segmentstatus der importierten Inhalte ist auf "editiert" gesetzt so dass diese Texte auch einfach mit Hilfe des Filters geprüft werden können.

Abschließende QA-Maßnahmen möglich in memoQ

media_1276262099714.png
Die Integrität der Tags und vieles mehr kann über die integrierten QA-Funktionen in memoQ geprüft werden. Hier sind viele Einstellungen möglich.

Simple collaboration tip for using RTF tables in memoQ

The next few days will be largely occupied with a collaborative project in memoQ where the other person does not have access to a memoQ server. In earlier versions of memoQ I typically dealt with this using bilingual views in native memoQ format for exchange. These would be imported into the other project, translated, exported, the re-imported into the originating project.

This time I decided to try something different using the new RTF table export feature in memoQ version 4.2. I carried out the following steps:
  1. Set up the translation project in memoQ with all the necessary source files. Check the file's segmentation and adjust as appropriate before starting the work.
  2. Clone the project by copying it to the second translator's machine.
  3. Both persons translate agreed sections of the text.
  4. When one person's section is ready for checking, a bilingual export of the full document is made, then all rows below the header which are not part of the section to be exchanged are cut out. (I first tried to do this via a view, but I discovered that RTF exports of the views have the row numbers changed in the current version - see Gabor's tip for a better way to do this below.)
  5. The truncated RTF table is sent to the other person, who imports it into the project. Because the project was cloned and all IDs are identical, the appropriate rows will be updated. The status of the updated rows is set to "edited", making them easy to filter and proofread or feed to the translation memory by filtering, selecting and confirming the rows.
This isn't a technique I would usually have thought to use, but it is a simple, viable, low-tech solution for occasional collaboration using this translation environment tool. The attractive part of this technique for me is that a "round trip" (generating a bilingual, sending it for translation, then receiving and re-importing the translated bilingual) is not imperative. It may offer a bit of needed flexibility in some situations.

I asked Kilgray about dynamic segment range filtering for bilingual exports where the row IDs are tracked, which I think would be rather convenient for doing what I did manually by deleting rows in Step 4 above, and Kilgray's head of development, Gabor Ugray, shared the following useful tip which can be used to accomplish the same thing, perhaps with a bit more flexibility:
Just one thought here. If you click Next when creating a two-column RTF export, you have these options below:

I think the option to not include locked rows may be what you need here. I just did that last week with a translation. The documents were part running text that needed reviewing, and part tables with basically product names that did not. I first translated the running text only; with Clear translations and an on-the-fly filter, locked all other segments; then went on to export, effectively, only confirmed segments, scattered around the whole document. These were then reviewed by the agency and sent back to me, while in the meantime I happily churned away at the rest of the document on my end. As soon as the RTF is exported, you no longer need the locking within the project, I removed that right away.
Within a document, row numbers are preserved this way. (With views, they are also preserved, but of course the RTF shows the row numbers from the view itself, not the various documents on which the view is based.)

Jun 10, 2010

Choosing an agency or an independent translator

A translation colleague in Brazil, José Henrique Lamensdorf, has entertained and educated me for many years with his observations on the art and business of translation. He recently wrote an article on when to consider hiring an agency and when it is probably best to work directly with a translator. It's an excellent overview, and I agree with most, if not all the points. It is definitely worth reading here. If you are in need of translations for personal use or for your company, José's checklist is well worth taking into account.

One statement I cannot agree with is "Don't fall for the 'native speaker' talk. If a translator is truly competent, they'll have mastered the target language, regardless of where they have been born." If my memory is correct, José translates often into English, and he is most likely very good at it given the way he usually expresses himself in that language. In my own language pair I know a few people who can translate at a high level of competence into the language which they do not speak as natives, but these people are rare exceptions. More common are those who think they do so or who think that a lack of native fluency offers them some bizarre advantage. A state testing committee composed of Germans and UK English natives once decided that I translate better into German than into my own language, American English. (This was the result of the state exams I took in Germany several years ago.) However, this judgment is more a reflection of the committee's incompetence in understanding American English, not of the brilliance of my German prose. I'll admit that I can usually put together a coherent sentence in German; after 35 years of working with the language I would be rather embarrassed not to do so. But I do not believe that my writing in German or my translations into that language (done only for fun or pro bono with the rarest exceptions) in any way approach what I can accomplish in English.

Actually, given José's usual precise phrasing, I am very likely reading him wrong. I do agree that a truly competent translator will only translate into a target language that is well mastered, but the real problem is - the reason that it is so easy to misread his statement - so many believe they have this competence but do in fact not.

But I usually avoid throwing punches in the native speaker debate. I figure each person has the right to risk looking like a fool, and that applies to customers as well as service providers.

Jun 5, 2010

A customer's view of the Online Translation Manager from lsp.net

Last September I posted a small note about an online management system and translation provider network that colleague Ralf Lemster told me about at a ProZ powwow. As development plans often go, the plans for this system's release and beta testing were implemented on a schedule that was a little different from the one described. Although the system had been productive for something like 6 years with a small group of companies, the upgrades implemented to accommodate a wider circle required and received a great deal of careful consideration. The beta test phase of the commercial release actually began in January and was completed at the end of April. In that time the system's interface for project managers experienced some important changes that are relevant to the way that many organizations work. You can read about the current state of the system and terms of use on the web pages of lsp.net.

However, those pages in their current state don't really tell me what I would want to know about the system. There's a lot of talk about features, a little about benefits and a bunch of high quality screenshots. What's missing for me are good process descriptions. Workflows.

I tested this system occasionally over a period of four months and was involved with two others (my former partner and her assistant) who tried to wrap their heads around it. It is a very good system for businesses ranging from busy freelancers who do a lot of billing to SME LSPs. But unless the processes are clearly understood it's hard for most people to deal with anything more complex than the back of an envelope or a chalkboard backed up by an Excel spreadsheet.

As part of my recent shift in activities, I now have access to this system in two incarnations: a fully configured company setup for one of the companies that has been using the system for years and the demonstration system for the SaaS provider lsp.net. This enables me to test a wide range of functions and observe carefully how the system is put to daily use. It's very interesting to talk to the individuals making use of it and hear how their practical needs have shaped the system over the years.

I am familiar with several other systems with a similar purpose, and as a translator I am the victim of a number of web-based project management systems from various clients and former clients. Generally I don't think much of these, and their cost can range from substantial to astronomical. I think it's fair to say that this system offers the best balance and value for cost that I've seen yet. It's not perfect, and there are things I hope to see added, many of which are in fact on the development roadmap already. The company, like Kilgray, pursues a steady, well-thought out course for its innovation and tends not to shoot from the hip just because some geek thinks a feature would be "cool". I don't agree with every approach, but I appreciate the thought behind the structure, and after a bit of familiarization, the reasons for particular design decisions often become much more apparent and more desirable than alternatives.

Enough introduction. I intend to show how this system works by presenting a few basic perspectives and workflows. In this post I will show a typical customer experience for submitting a text and receiving a finished translation job. Future posts will deal with the system from the perspective of translators, project managers and others using it.

Each licensee of the Online Translation Management (OTM) system has a dedicated subdomain, such as myls.qtn.net, the demonstration site for the system. This trilingual (DE, EN, ES) demo site doesn't have all the typical text for terms & conditions that one would find on a production site such as Ralf Lemster's rlft.qtn.net or ESmedo in Spain. (But that's the site I'll use, because I can test it from all sides for purposes of explaining how things work. Nonetheless, have a look at these three other sites to see the variations in how the environment is implemented.)

The initial screen layout is simple but functional, with standard navigation elements. Customization is limited to color and content. If you want a fancy front-end, do as you please with your regular web site or blog and link to your workflow subdomain.

Let's get straight down to business and 
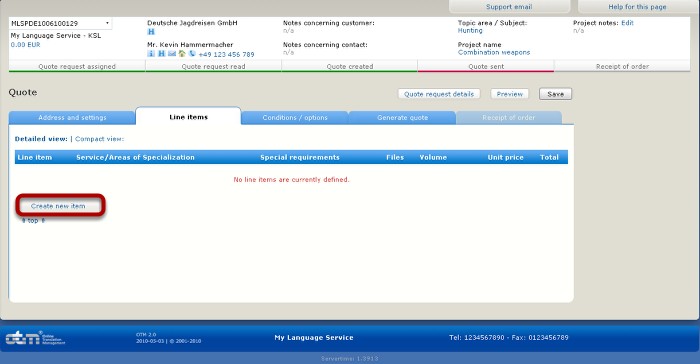
request a quotation by clicking the third element in the navigation bar above.

The following form appears:

I filled out the form and submitted my request with one file upload. The automated response I got after submitting the request was as follows (yes, I made typos):


My online submission was followed by an e-mail:


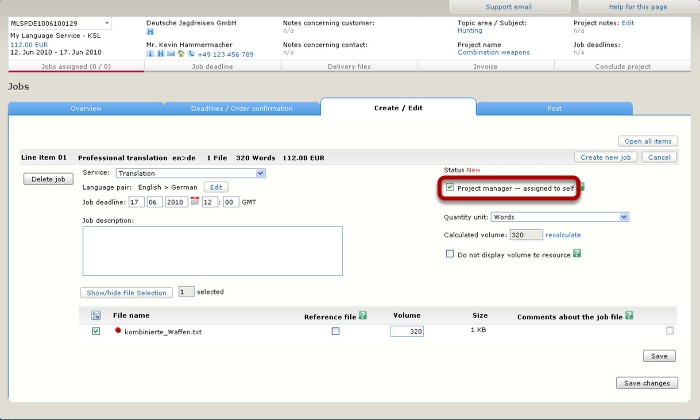
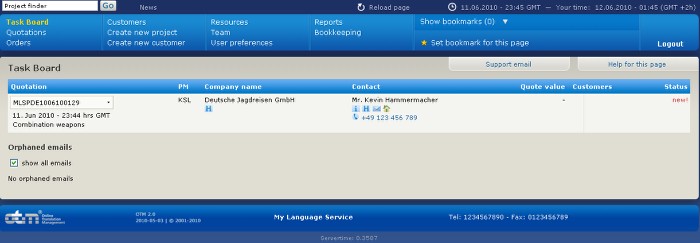
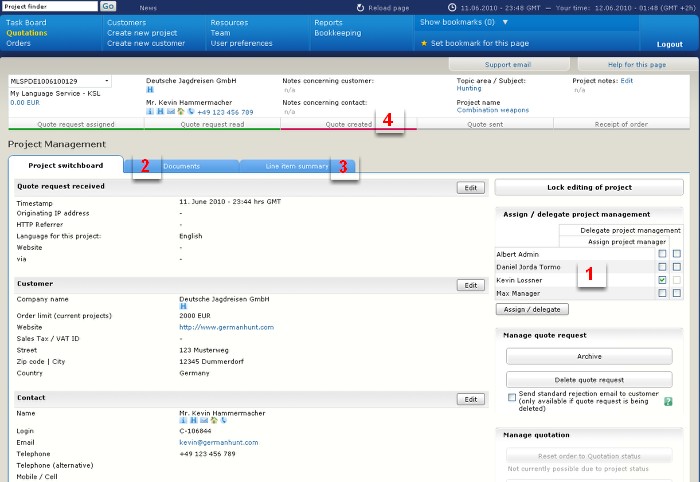
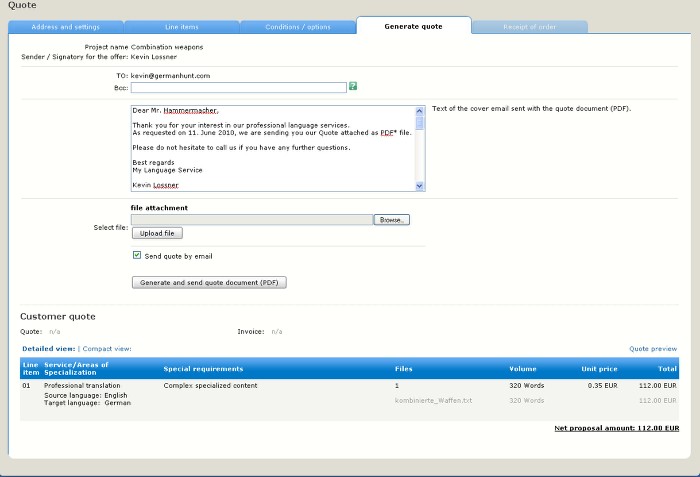
After the project manager (yours truly) received the request, reviewed it and put together an offer, an e-mail with the following quotation was received:


 After the terms were accepted and the order was placed, the following e-mail was received in acknowledgment:


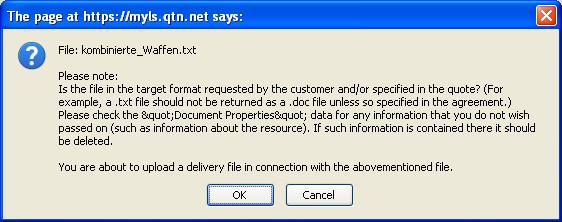
Of course, this text and others can be customized to suit the preferences of the licensee. The little quirks in the localization here are not from me. The project manager also activated customer service pages, which provide a secure area for HTTPS download of finished jobs or secure uploading of additional files. Deliveries can also take place via e-mail links. This eliminates many problems of attachment size or file security, an issue for many legal projects, for example.

The notification mail I received regarding the customer service pages was as follows:


That link works at the moment, by the way. Go ahead and try it out. I or someone else may delete it eventually.

When the job was completed, I received another e-mail notice:


Clicking the link took me to the login web page:


Since I had never been in the system before with this customer account, I was asked to choose a preferred language for the interface. This can be changed later.


Just for laughs I chose German. Bear with me if you don't read that language. Here is the main customer page telling me that there is a job waiting to be delivered:


The page from which the finished job can be downloaded looks like this in German:


And like this in English:


Afterward I received an e-mail with a PDF attachment for the invoice. This is an option; invoices can also be printed out and mailed, of course.


The invoice looks like this:


All pretty straightforward I think. Any part of this communication can be switched off to suit your preferences and those of your clients. I'm not particularly bothered by the little quirks in the interface localization here (such as "MwSt" instead of "VAT" in the invoice shown), because I can fix that when I customize (or gripe at the system developers to make the change).

For a bit under 30 euros per month I can offer my clients semi-automated professional communication, secure submission of files for work or quotation and secure deliveries. The last point is very, very important to me, because often I have delivered a job, hopped in the car and driven off to an urgent appointment only to learn to my dismay that the e-mail got lost or delayed. With a system like this the client can just log into his secure area and see if the file is ready.

For clients who don't want to deal with logging into a secure file area with a password to view their project archives, etc. (the majority according to one OTM user), simple deliveries via a secure HTTPS e-mail link are possible. This happens, for example, if the customer does not have service pages activated. A mail is received which looks like this:

The link leads to a secure web page with a link for downloading the file directly. This also avoids the problem of dealing with large file attachments for e-mail, which can cause problems for some e-mail software or accounts.


The vulnerability here is, of course, the e-mail. If the customer doesn't get it, then s/he'll not know that the project is finished. I prefer the customer service pages, because they offer better fail-safe security, which hard experience has taught me is very necessary.


Related posts:

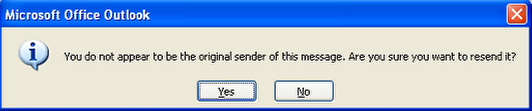
Re-sending e-mail to OTM